

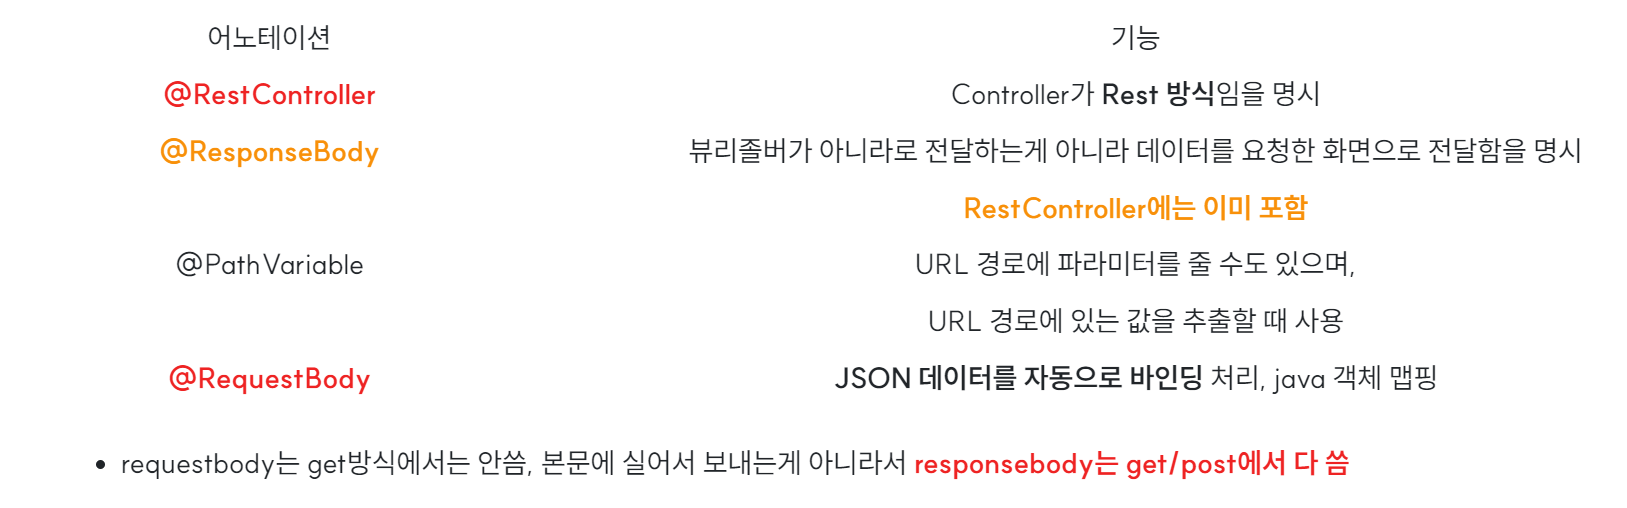
1. JavaScript vs JQuery
- jquery는 단수 함수 암기 싸움
| JavaScript | JQuery |
| 웹페이지를 동적으로 표현해주는 언어 | 자바스크립트를 더 간편하게 사용해주는 자바스크립트 라이브러리 |
| 경고창, 확인창, drop다운 기능, 탭 기능 | 높은 생산성 |
| 선택자로 한번에 선택 | |
| 선택자로 선택한 태그를 제어 |
1.1. 사용방법
1.1.1. 1. 직접 사용
1. http://jquery.com/download/ 에서 제이쿼리 소스 다운로드
2. Download the compressed, production jQuery x.x.x 로 처리된 것을 우클릭 - 다른이름저장
3. 다운로드 후 프로젝트 안의 파일에 넣어줌
Download jQuery | jQuery
link Downloading jQuery Compressed and uncompressed copies of jQuery files are available. The uncompressed file is best used during development or debugging; the compressed file saves bandwidth and improves performance in production. You can also download
jquery.com
      <javascript />


          <!-- jquery -->
    <script src="js/jquery-3.6.3.min.js"></script>
1.1.2. 2. 링크 이용
1. 사용할 페이지에서 아래와 같은 링크 걸어서 사용
2.<script type="text/javascript" src="//code.jquery.com/jquery-3.4.0.min.js"></script> 혹은 <script type="text/javascript" src="https://ajax.googleapis.com/ajax/libs/jquery/1.6.2/jquery.min.js"></script>
2. 함수
- 주된 사용법은 $("선택자").함수
= js의 document~ 이런거 - jquery 시작 객체를 반환
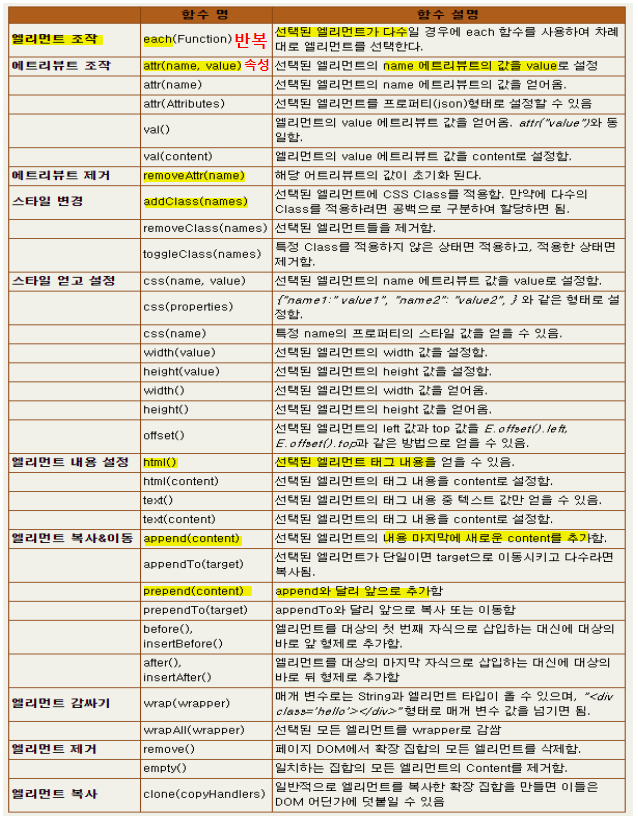
3. 조작
3.1. 1. 선택자 & 값 확인


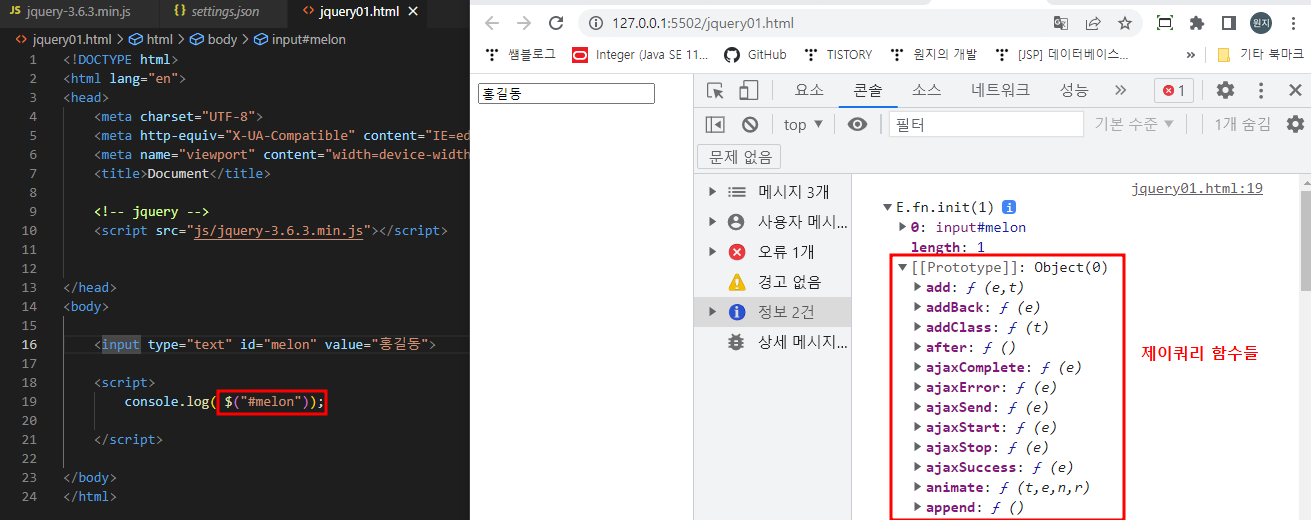
jquery01.html

      <html />


      <!DOCTYPE html>
<html lang="en">
<head>
    <meta charset="UTF-8">
    <meta http-equiv="X-UA-Compatible" content="IE=edge">
    <meta name="viewport" content="width=device-width, initial-scale=1.0">
    <title>Document</title>

    <!-- jquery -->
    <script src="js/jquery-3.6.3.min.js"></script>

</head>
<body>

    <input type="text" id="melon" value="홍길동">
    <input type="text" class="apple" value="홍길동">

    <script>
        // $("선택자로") 요소를 얻으면, 제이쿼리 시작 객체를 반환해줍니다.
        // $("선택자").제이쿼리함수()

        // console.log( $("#melon")[0] ); //순수한 엘리먼트

        //var result = document.getElementById("melon").value;

        //값을 얻음
        var result =  $("#melon").val();
        console.log(result);

        //값을 변경
        $("#melon").val("멜론");

        //값을 변경
        $(".apple").val("변경할값");

    </script>

</body>
</html>
3.2. 2. 문서 객체 조작 attr()
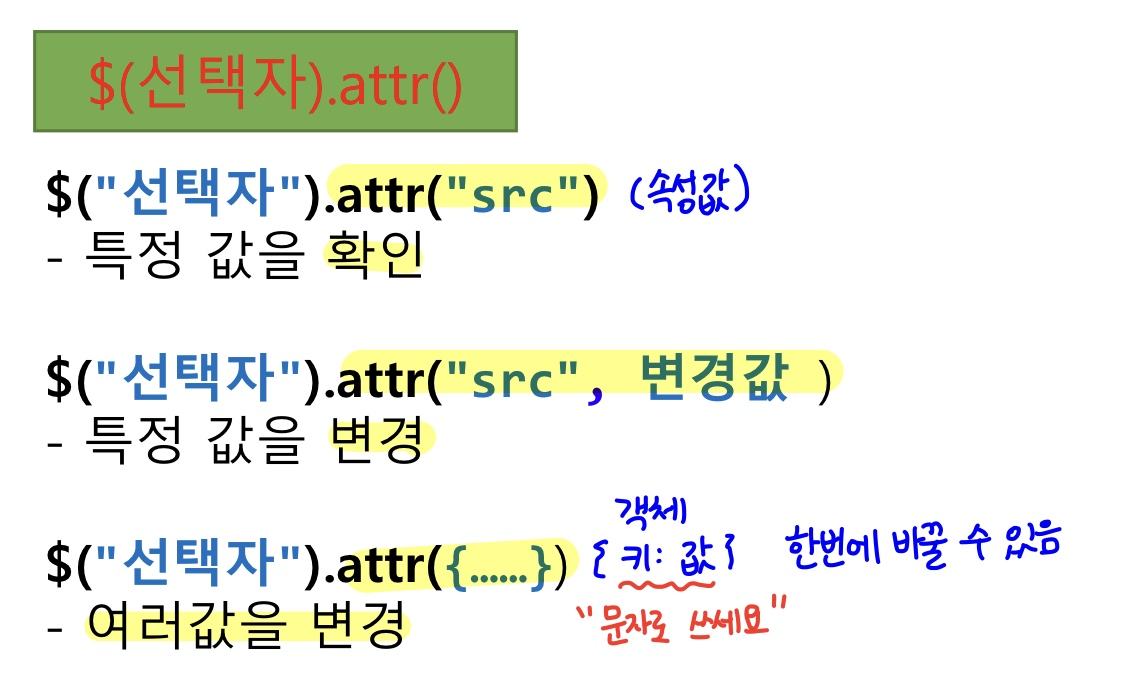
- removeAttr() - 특정 속성 제거
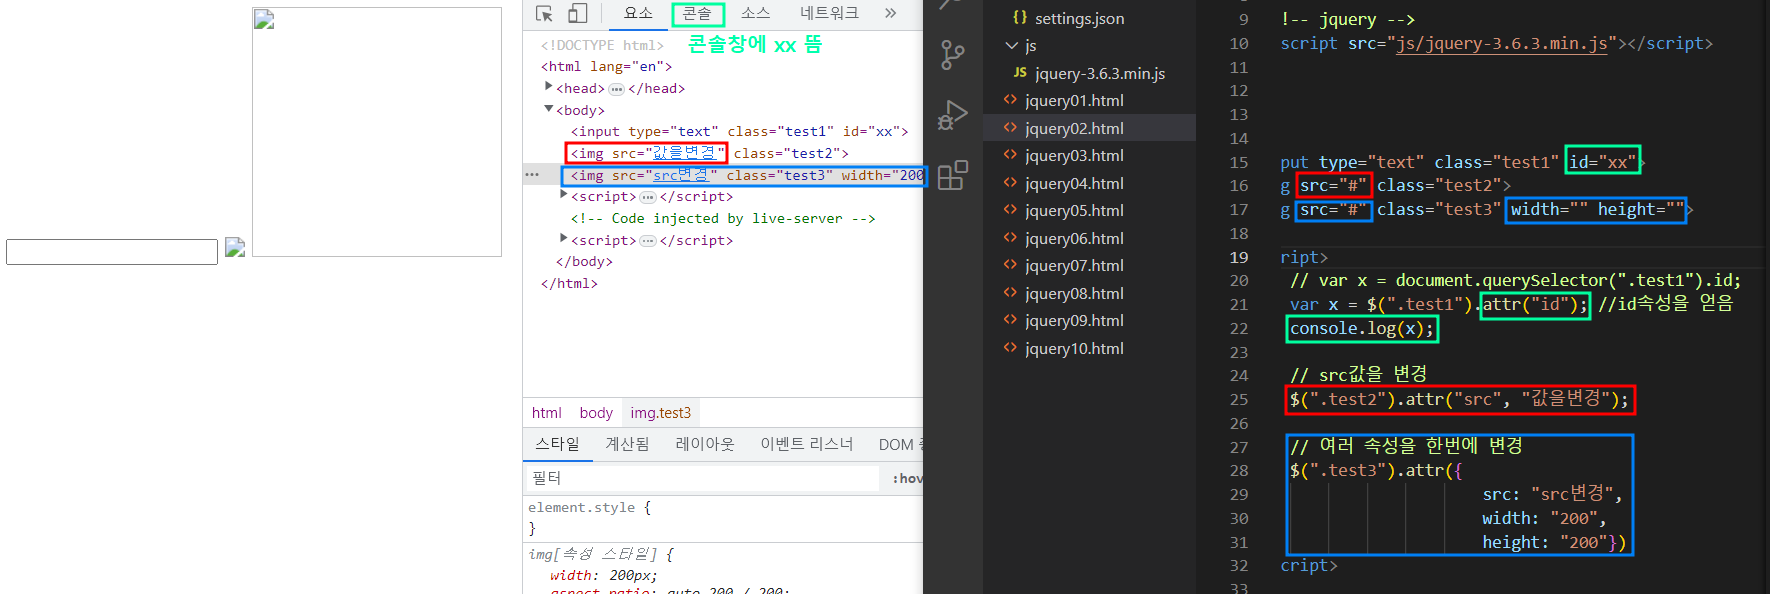
jquery02.html
      <html />


      <!DOCTYPE html>
<html lang="en">
<head>
    <meta charset="UTF-8">
    <meta http-equiv="X-UA-Compatible" content="IE=edge">
    <meta name="viewport" content="width=device-width, initial-scale=1.0">
    <title>Document</title>

      <!-- jquery -->
      <script src="js/jquery-3.6.3.min.js"></script>

</head>
<body>

    <input type="text" class="test1" id="xx">
    <img src="#" class="test2">
    <img src="#" class="test3" width="" height="">

    <script>
        // var x = document.querySelector(".test1").id;
        var x = $(".test1").attr("id"); //id속성을 얻음
        console.log(x);

        // src값을 변경
        $(".test2").attr("src", "값을변경");

        // 여러 속성을 한번에 변경
        $(".test3").attr({
                            src: "src변경",
                            width: "200",
                            height: "200"})
    </script>

</body>
</html>
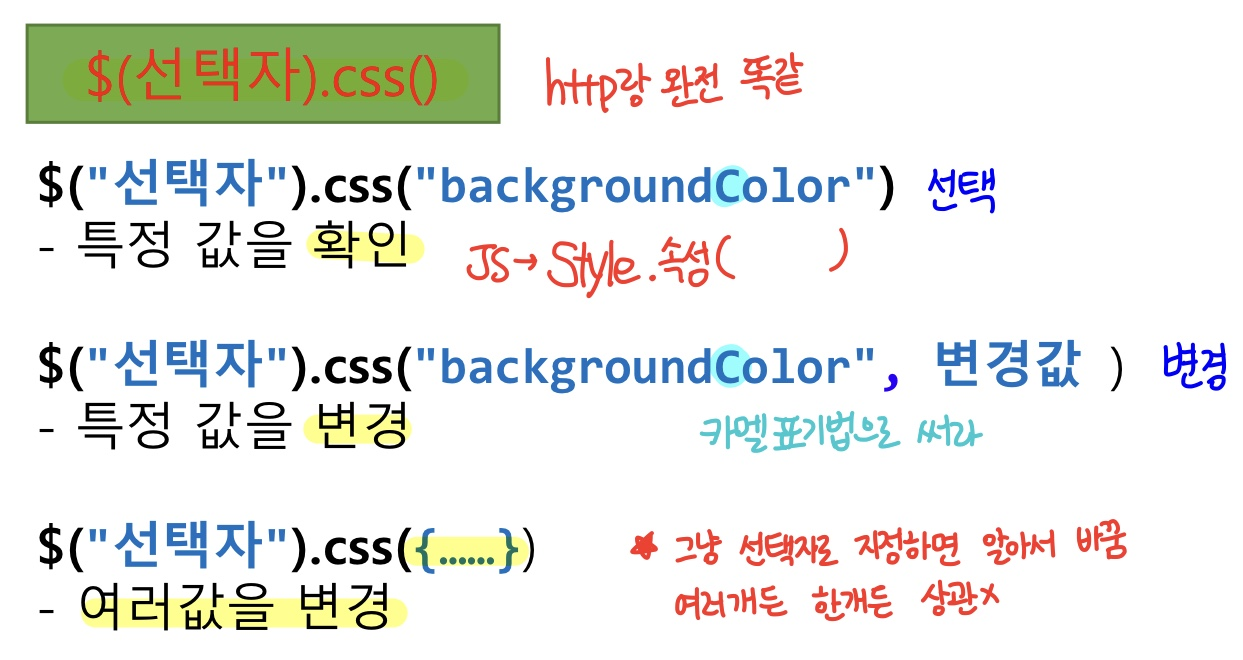
3.3. 3. 문서 객체 조작 css()
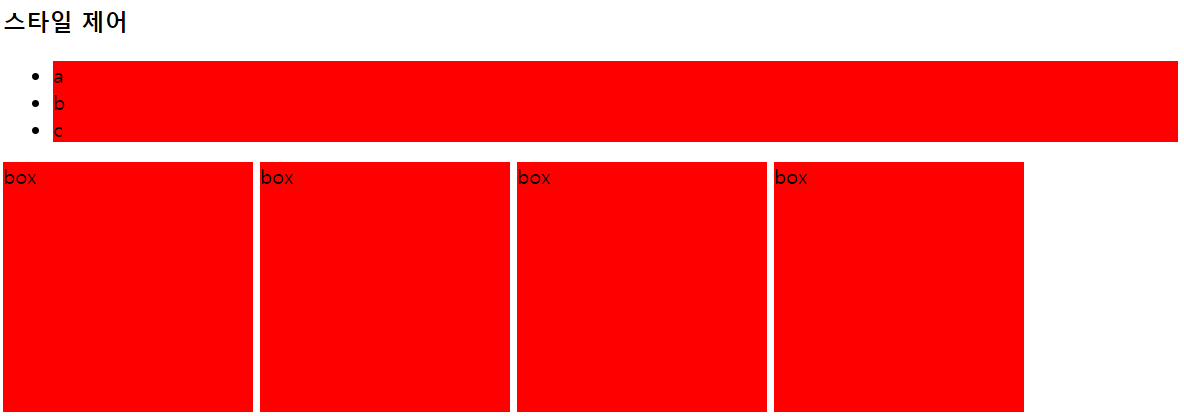
jquery03.html
      <html />


      <!DOCTYPE html>
<html lang="en">
<head>
    <meta charset="UTF-8">
    <meta http-equiv="X-UA-Compatible" content="IE=edge">
    <meta name="viewport" content="width=device-width, initial-scale=1.0">
    <title>Document</title>

    <!-- jquery -->
    <script src="js/jquery-3.6.3.min.js"></script>

</head>
<body>

    <h3>스타일 제어</h3>
    <ul class="test1">
        <li>a</li>
        <li>b</li>
        <li>c</li>
    </ul>

    <div class="box">box</div>
    <div class="box">box</div>
    <div class="box">box</div>
    <div class="box">box</div>

    <script>

        //
        // var li = document.querySelectorAll(".test1 > li"); //.test1 아래의 li
        // for(var i = 0; i < li.length; i++) {
        //     li[i].style.backgroundColor = "tomato";
        // }

        // css속성을 변경
        $(".test1 > li").css("backgroundColor", "red") //li태그가 한개던지 여러개던지 상관x

        //css속성 확인
        var color = $(".test1 > li").css("backgroundColor");
        console.log(color);

        //css속성을 한번에 변경
        $(".box").css({
            backgroundColor: "red",
            width: "200px",
            height: "200px",
            display: "inline-block"
        });

    </script>

</body>
</html>
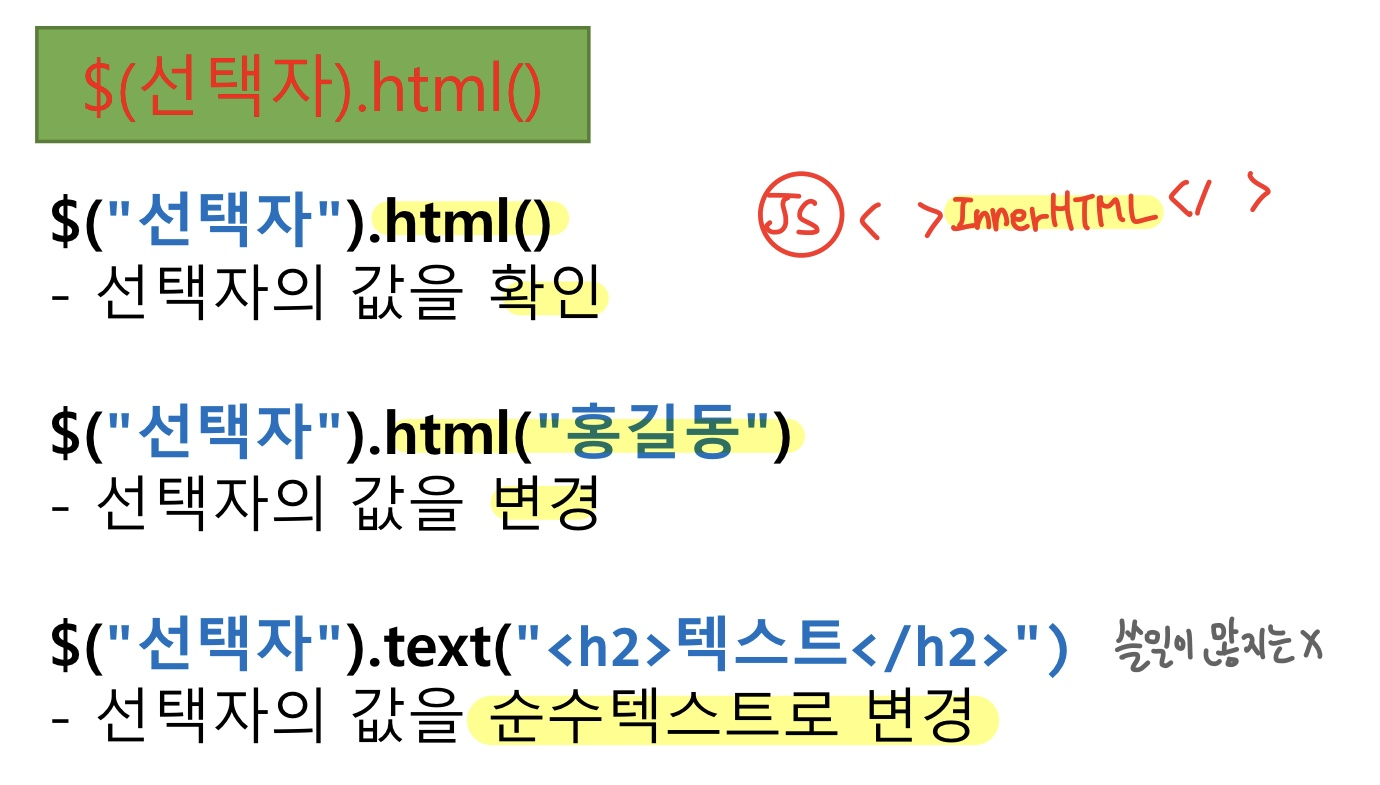
3.4. 4. 문자 조작 html()

jquery04.html
      <html />


      <!DOCTYPE html>
<html lang="en">
<head>
    <meta charset="UTF-8">
    <meta http-equiv="X-UA-Compatible" content="IE=edge">
    <meta name="viewport" content="width=device-width, initial-scale=1.0">
    <title>Document</title>

    <!-- jquery -->
    <script src="js/jquery-3.6.3.min.js"></script>

</head>
<body>

    <div class="test1"></div>
    <div class="test2"></div>

    <script>
        //js
        // document.querySelector(".test1").innerHTML = "<a href='#'>kkk</a>";

        //값을 변경
        $(".test1").html("<a href='#'>kkk</a>"); //태그로
        $(".test1").html(""); //공백으로
        $(".test1").html("홍길동");

        //값을 얻음
        var result = $(".test1").html();
        console.log(result);


        //text() - 순수한 텍스트로 인식
        $(".test2").text("<a href='#'>kkk</a>");

    </script>

</body>
</html>
- text는 a태그가 아니라 순수한 텍스트로 인식
3.5. 5. 클래스 조작 addClass(), removeClass(), toggleClass()
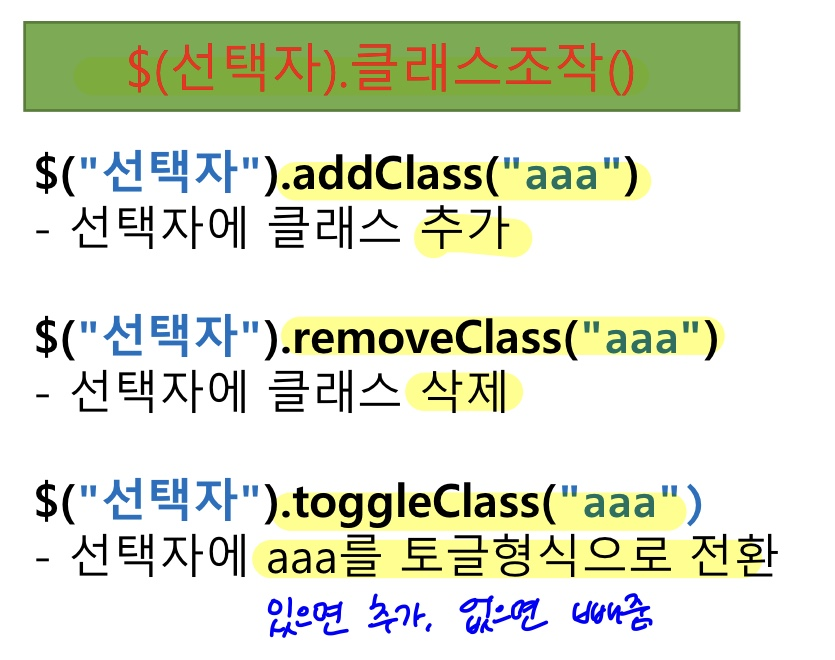
- js의 document.getelement~().classList.add()와 같음
jquery05.html
<html />
<!DOCTYPE html>
<html lang="en">
<head>
<meta charset="UTF-8">
<meta http-equiv="X-UA-Compatible" content="IE=edge">
<meta name="viewport" content="width=device-width, initial-scale=1.0">
<title>Document</title>
<!-- jquery -->
<script src="js/jquery-3.6.3.min.js"></script>
</head>
<body>
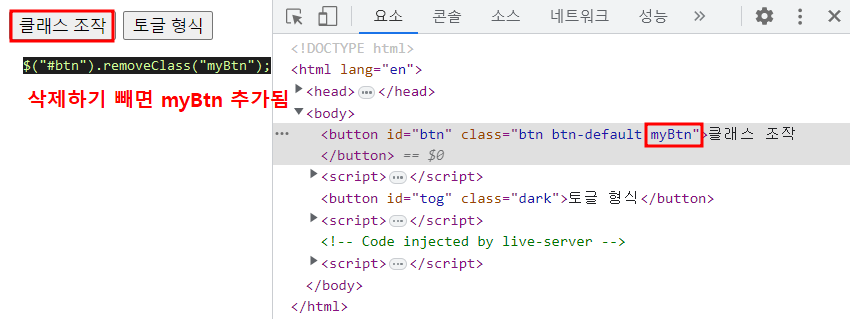
<button id="btn" class="btn btn-default">클래스 조작</button>
<script>
//js
//document.getElementById("btn").classList.add("myBtn"); //클래스 추가
//document.getElementById("btn").classList.remove("myBtn"); //클래스 삭제
$("#btn").addClass("myBtn"); //클래스 추가
$("#btn").removeClass("myBtn"); //클래스 삭제
</script>
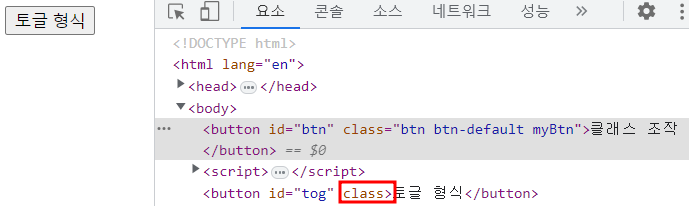
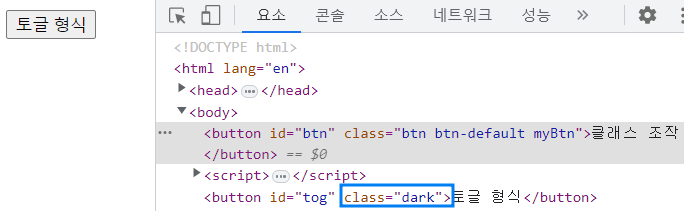
<button id="tog" class="dark">토글 형식</button>
<script>
$("#tog").click(function() {
console.log(this); //버튼 태그
// this.classList.toggle("dark"); //js코드
$(this).toggleClass("dark");
}) //클래스에 dark가 있으면 삭제, 없으면 추가
</script>
</body>
</html>
3.6. 6. 추가 함수
focus() - 태그의 마우스 커서 위치시킴
submit() - 태그 서브밋
부트스트랩 전용 함수 - 모달
modal("show") - 모달 띄우기
modal("hide") - 모달 숨기기

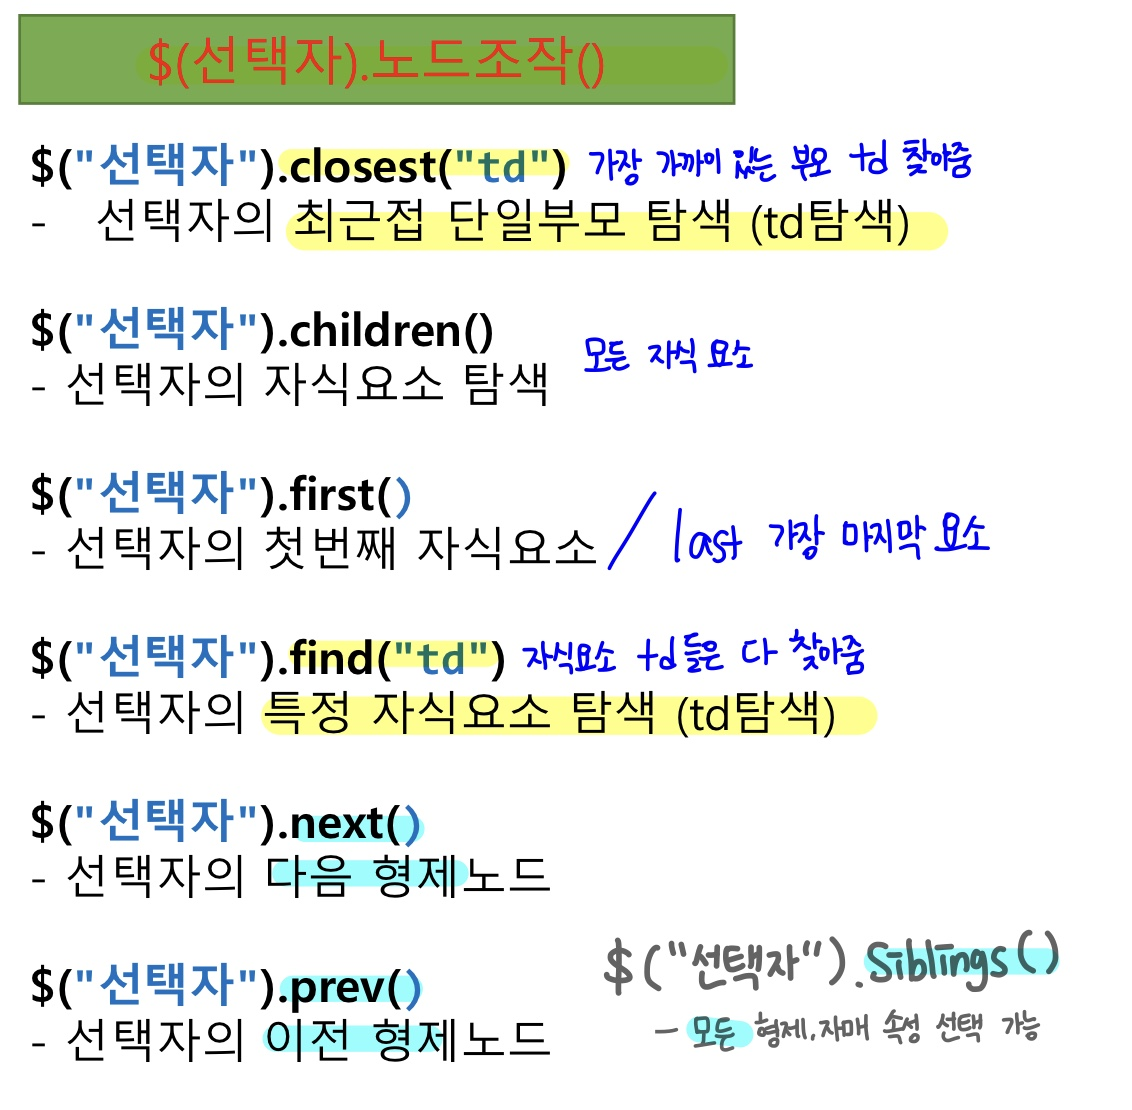
3.7. 7. 이웃, 형제 노드 조작
- js에서는 firstElementChild, nextElementSibling
2023.01.02 - [클라이언트/JavaScript] - [JavaScript] node remove, select(parent,children), class 속성제어
jquery06.html
<html />
<!DOCTYPE html>
<html lang="en">
<head>
<meta charset="UTF-8">
<meta http-equiv="X-UA-Compatible" content="IE=edge">
<meta name="viewport" content="width=device-width, initial-scale=1.0">
<title>Document</title>
<!-- jquery -->
<script src="js/jquery-3.6.3.min.js"></script>
</head>
<body>
<table class="xxx">
<tr>
<th>번호</th>
<th>이름</th>
<th>버튼</th>
<th>테스트</th>
</tr>
<tr>
<td>1</td>
<td>홍길동</td>
<td>
<button type="button" class="btn">버튼</button>
</td>
<td>
<span><i class="test">테스트1</i></span>
<span >테스트2</span>
</td>
</tr>
<tr>
<td>2</td>
<td>이순신</td>
<td>
<button type="button" class="btn">버튼</button>
</td>
<td>
<span><i class="test">테스트1</i></span>
<span >테스트2</span>
</td>
</tr>
</table>
<script>
/*
1. closest("선택자") - 최근접 단일 부모 선택
2. prev() - 이전 형제
3. next() - 다음 형제
4. siblings() - 모든 형제
5. first() - 첫번째 자식
6. last() - 마지막 자식
7. children() - 모든 자식
children 적용 한 다음 그중에서 first나 last
8. find("선택자") - 특정 자식
*/
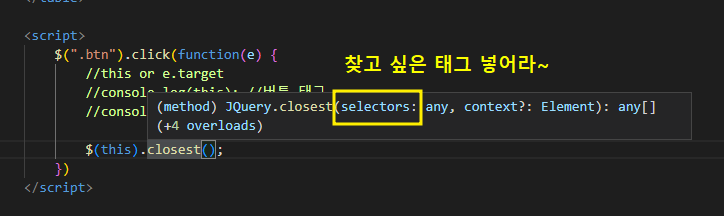
$(".btn").click(function(e) {
//this or e.target
//console.log(this); //버튼 태그
//console.log(e.target); //버튼 태그, this = e.target
// console.log( $(this).closest("td"));
// console.log( $(this).closest("tr")); //최근접 tr태그
// console.log( $(this).closest(".xxx")); //최근접 xxx클래스
// console.log( $(this).closest("td").prev() ); //이전 형제
// console.log( $(this).closest("td").next() ); //다음 형제
// console.log( $(this).closest("td").siblings() ); //모든 형제
console.log( $(this).closest("tr").children() ); //모든 자식들
console.log( $(this).closest("tr").children().first() ); //모든 자식들 중 첫째
console.log( $(this).closest("tr").children().last() ); //모든 자식들 중 막내
console.log( $(this).closest("tr").find(".test") ); //test자식
console.log( $(this).closest("tr").find("span") ); //span태그 자식
})
</script>
</body>
</html>
4. 이벤트 함수 (필수)
4.1. 1. ready
- java script - 페이지 로드 이후 실행하는 이벤트 - 페이지별로 1개만 사용가능
-
jquery - 페이지 로드 이후 실행하는 함수 - 여러 개 사용 가능 (Dom 객체)
      <html />


      <body>
    <script>
      //js - 페이지 로드 이후 실행하는 이벤트 - 페이지별로 1개만 사용가능
      //   window.onload = function () {
      //     console.log($("#btn"));
      //   };

      //jquery - 페이지 로드 이후 실행하는 함수 - 여러 개 사용 가능
      $(document).ready(function () {
        console.log($("#btn"));
      });

      $(document).ready(function () {
        console.log(2);
      });
    </script>

    <button id="btn">도큐먼트 ready</button>
  </body>
4.2. 2. click, keyup, change, mouseenter, mouseleave


      <html />


       <body>
    <button id="btn">이벤트 등록</button>

    <input type="text" id="tag" />

    <select id="sel">
      <option>1</option>
      <option>2</option>
    </select>

    <div style="background-color: red" id="mos">마우스 이벤트</div>

    <script>
      //클릭 1
      $("#btn").click(function () {
        console.log("click");
      });

      //키 관련 이벤트 2
      $("#tag").keyup(function () {
        console.log("key");
      });

      //체인지 3
      $("#sel").change(function () {
        console.log("chan");
      });

      //마우스 관련 이벤트 4
      $("#mos").mouseenter(function () {
        console.log("mouse enter");
      });

      $("#mos").mouseleave(function () {
        console.log("mouse leave");
      });
    </script>
  </body>
4.3. 3. on - 이벤트 위임
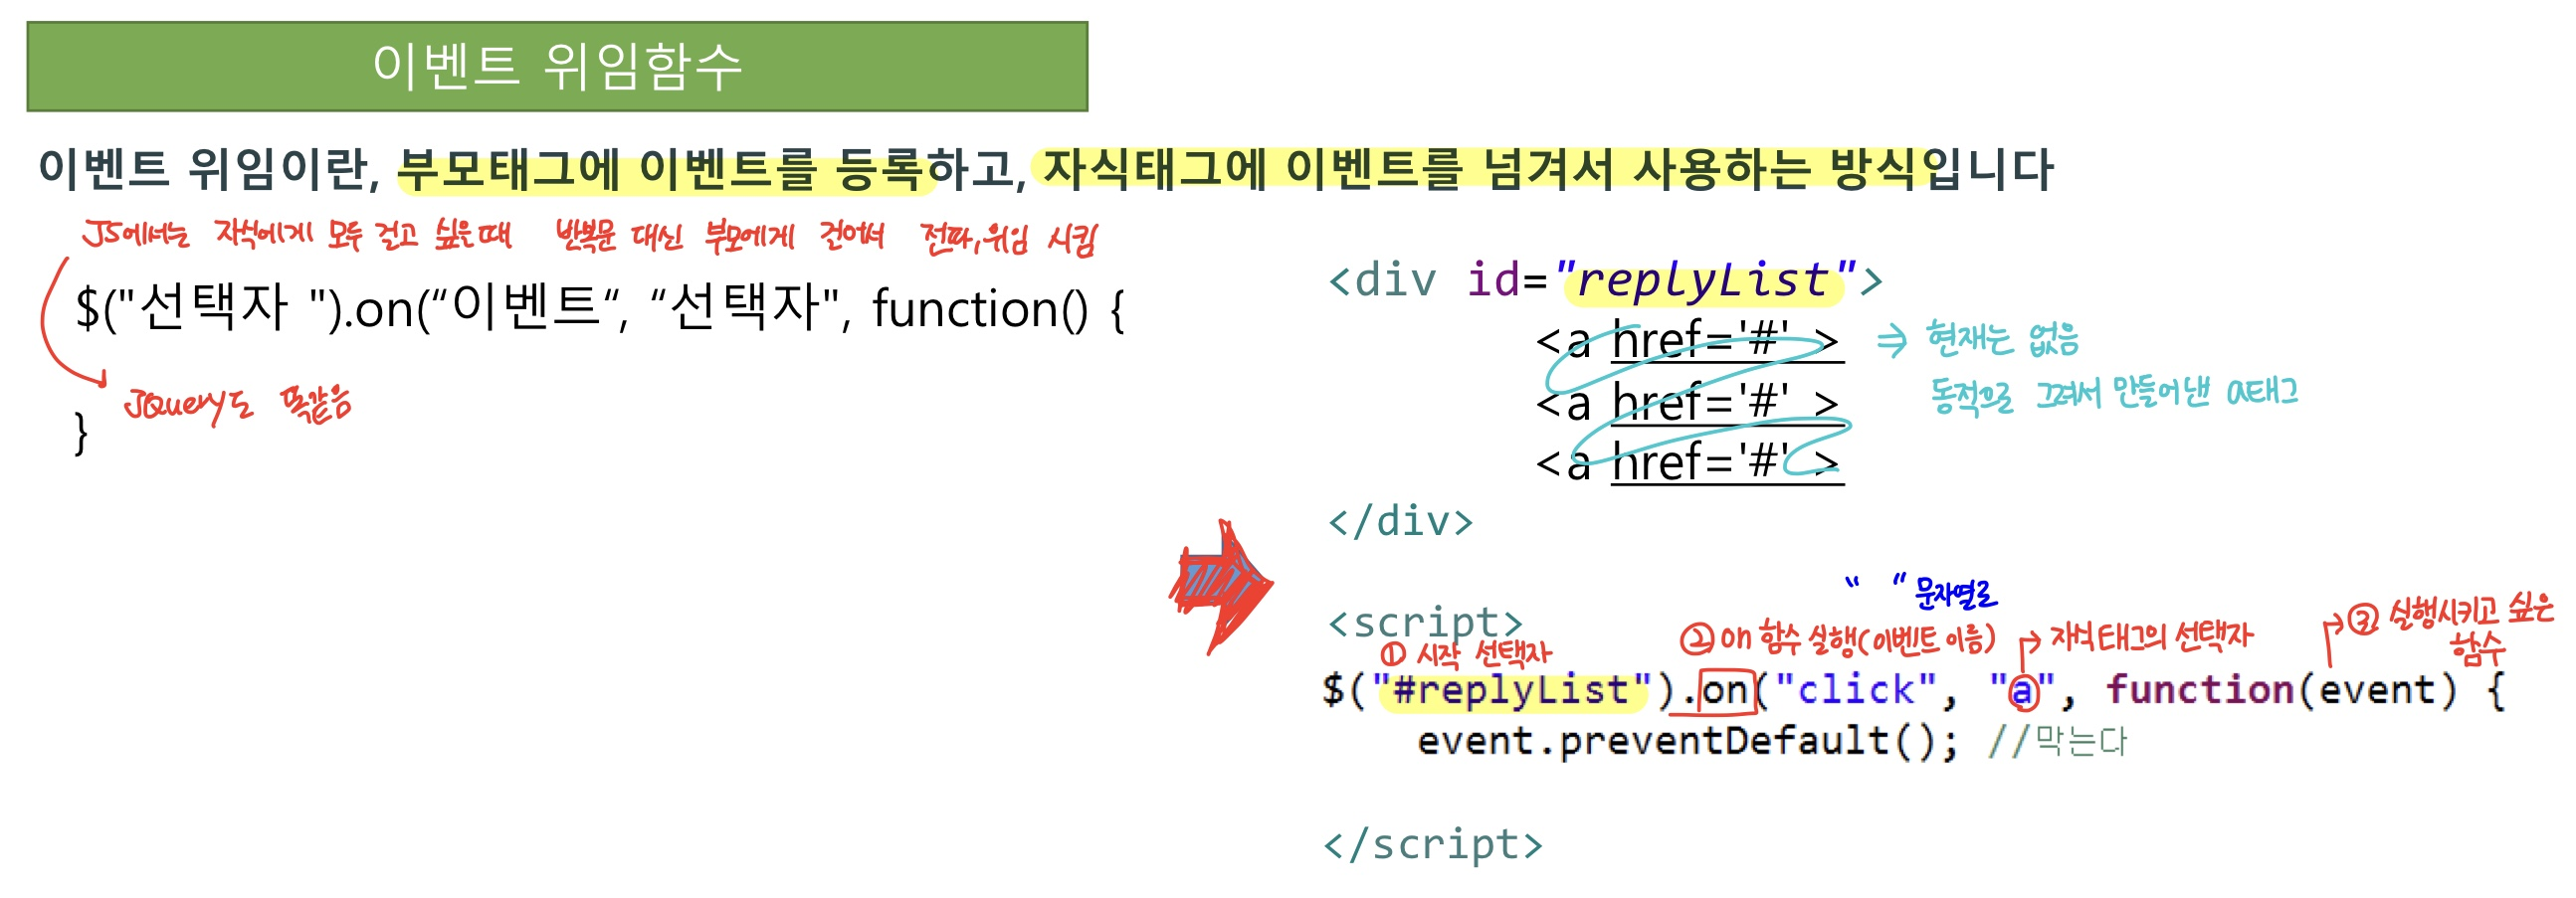

      <html />


       <body>
    <h3>이벤트 위임방식 on()</h3>
    <div id="box"></div>

    <script>
      setTimeout(() => {
        var str = "";
        str += "<a href='#'>태그1</a>";
        str += "<a href='#'>태그2</a>";
        str += "<a href='#'>태그3</a>";
        $("#box").html(str);
      }, 2000); //2초 뒤에 태그 생성

      // 어림도 없지 - 안 됨, 왜냐면 이거 할때 지칭할 a거기가 없음
      // $("a[href='#']").click(function() {
      //     console.log("a링크 실행")
      // })

      //(이벤트종류, 위임시킬선택자, 핸들러)
      $("#box").on("click", "a", function () {
        event.preventDefault(); //고유이벤트 중지
        console.log("a링크 실행");
      });
    </script>
  </body>
- 2초 후 태그1, 태그2, 태그3 생성
- $("a[href='#']").click(function () { console.log("a링크 실행"); });
문서가 로드될 때 존재하는 모든 a태그에 대해 클릭 이벤트 바인딩하는데 코드가 실행될 때 a태그가 없으므로
동적으로 생성되는 요소에 대해 이벤트를 연결하려면 이벤트 위임을 사용
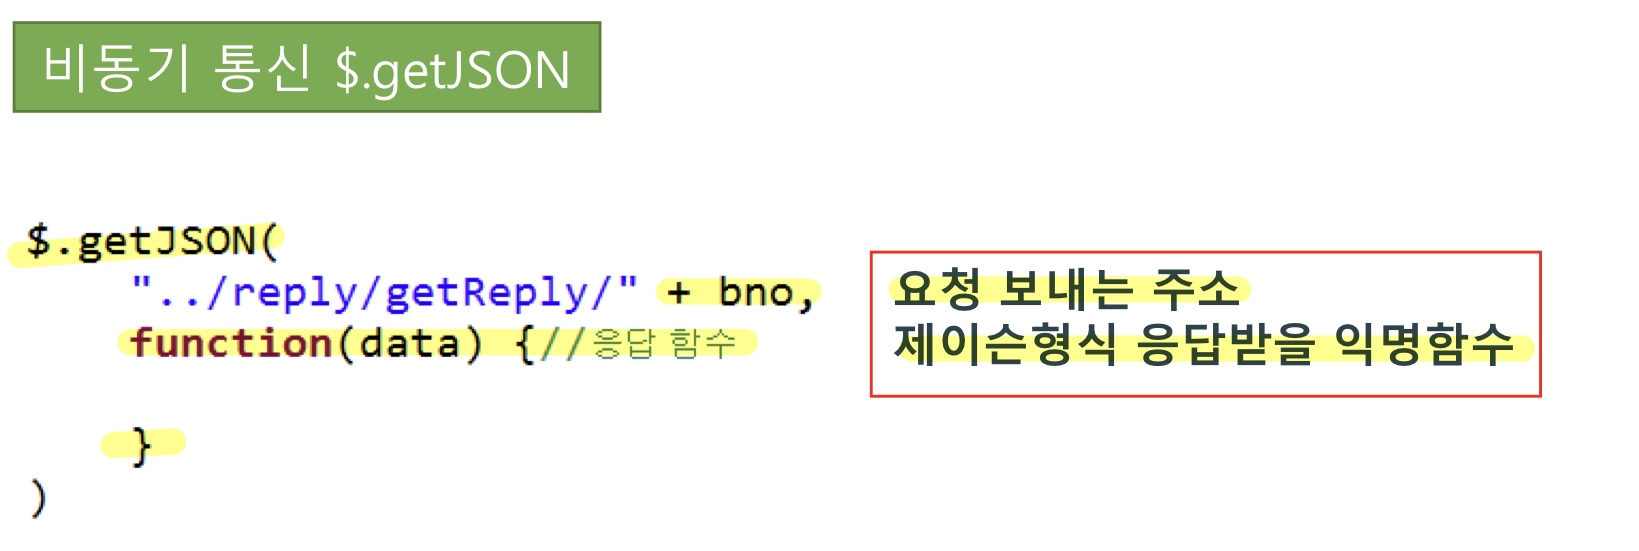
5. 비동기 통신 Ajax
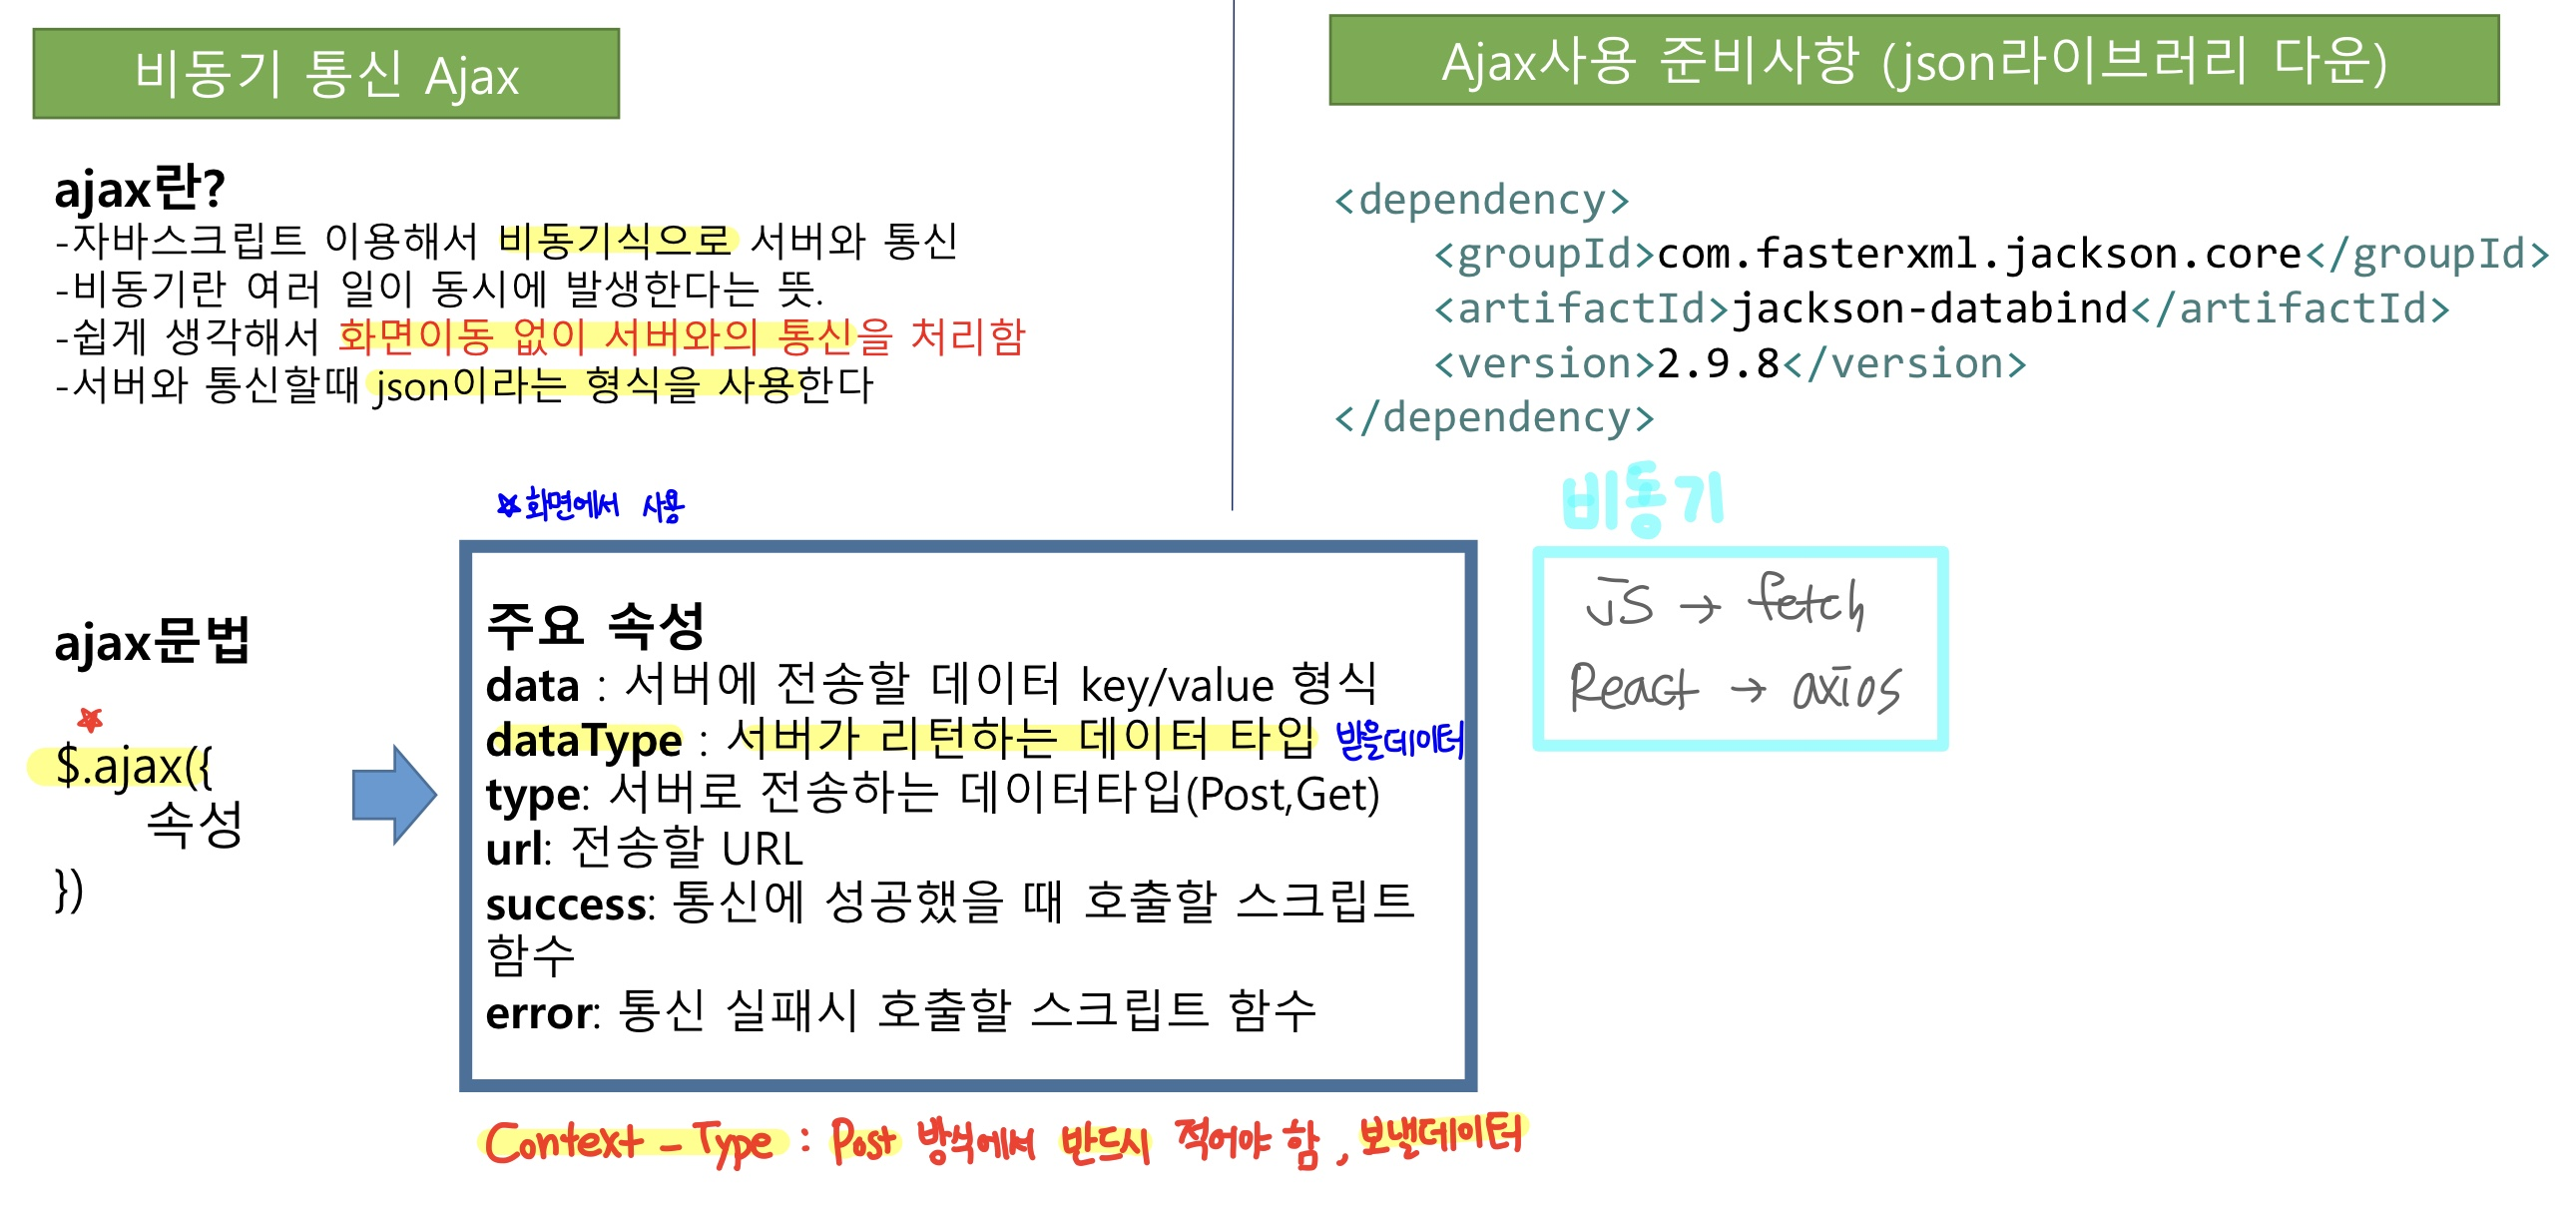
- 화면 이동 없이 서버와 통신
- json 형식을 사용
- js: fetch, react: axios 사용
- @CrossOrigin({"http://127.0.0.1:5502", "http://localhost:5502"}) //중괄호 문법 가능
으로 서버와 화면 연결 해 줌
| data | 서버에 전송한 데이터, key/value 형식 |
| dataType | 받을 데이터, 서버가 리턴하는 데이터 타입 |
| type | 서버로 전송하는 데이터 타입 - post, get |
| url | 전송할 URL |
| success | 성공시 호출할 스크립트 함수 |
| error | 실패시 호출할 스크립트 함수 |
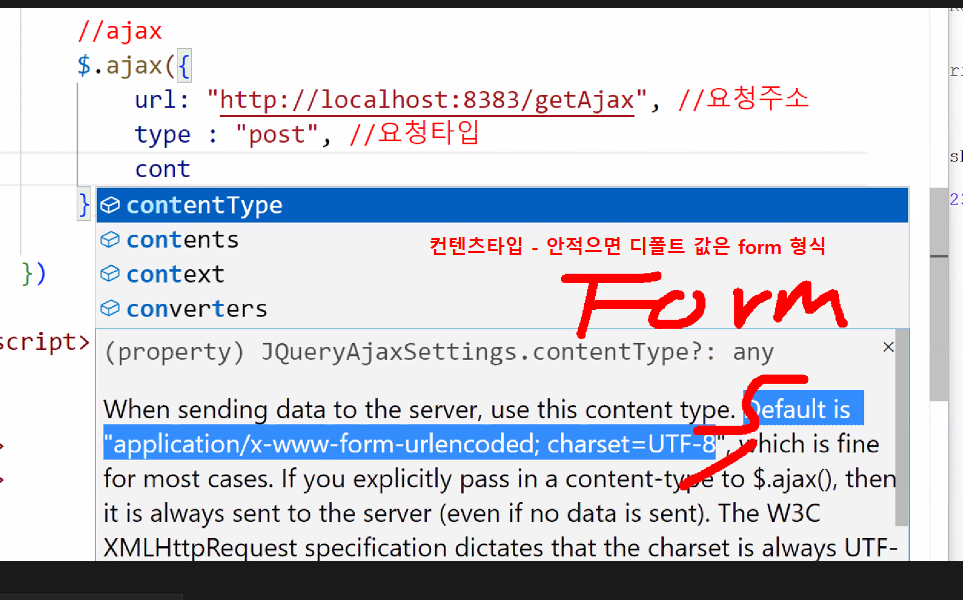
| content-type | 보낼 데이터, post 방식에서 반드시 적어야 함 |
5.1. post

<html />
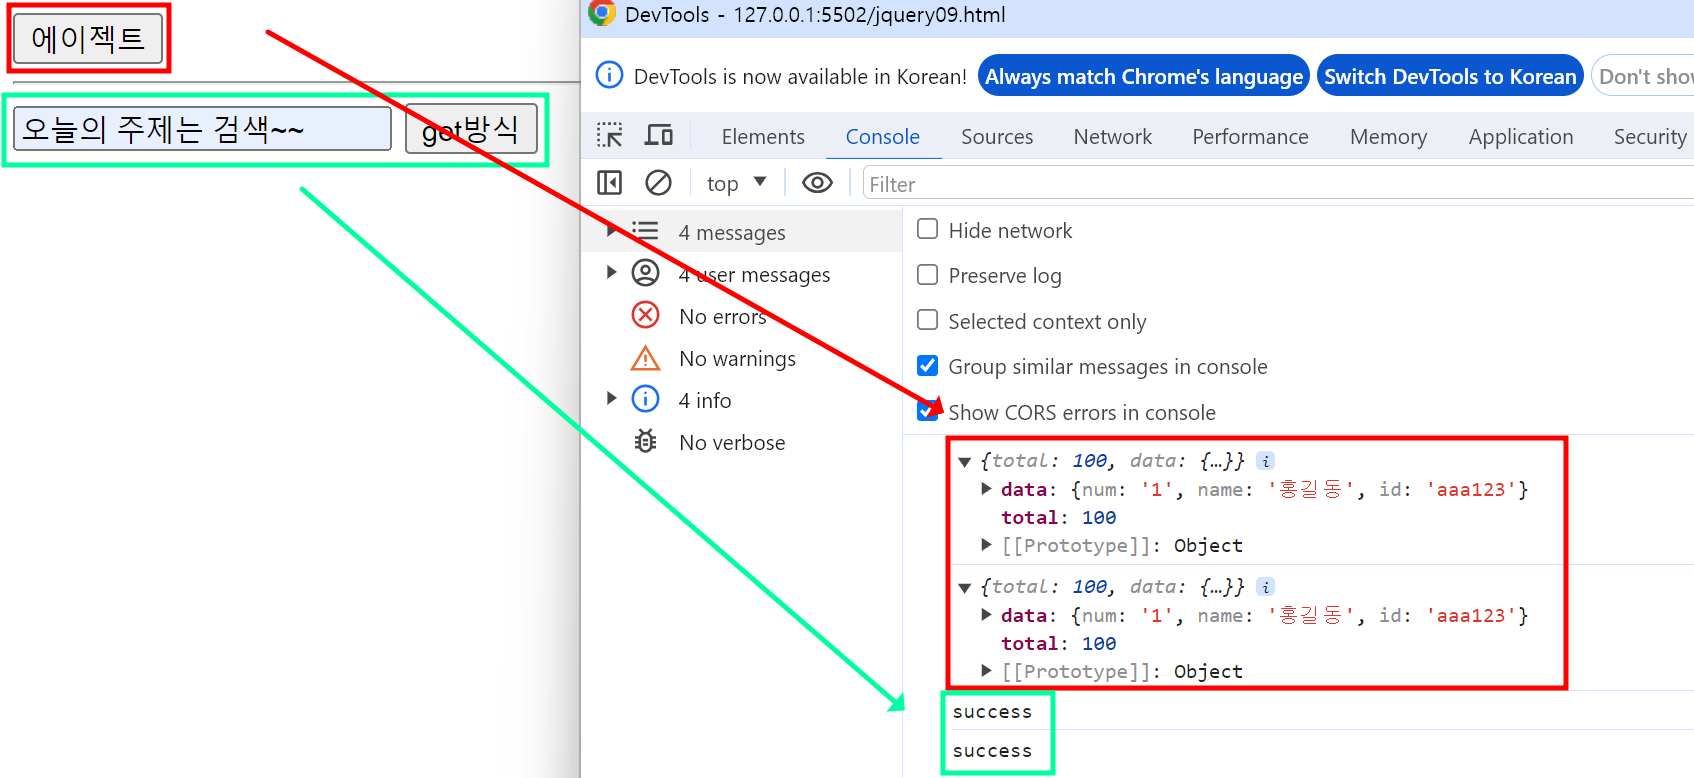
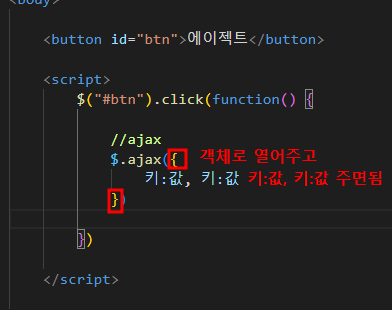
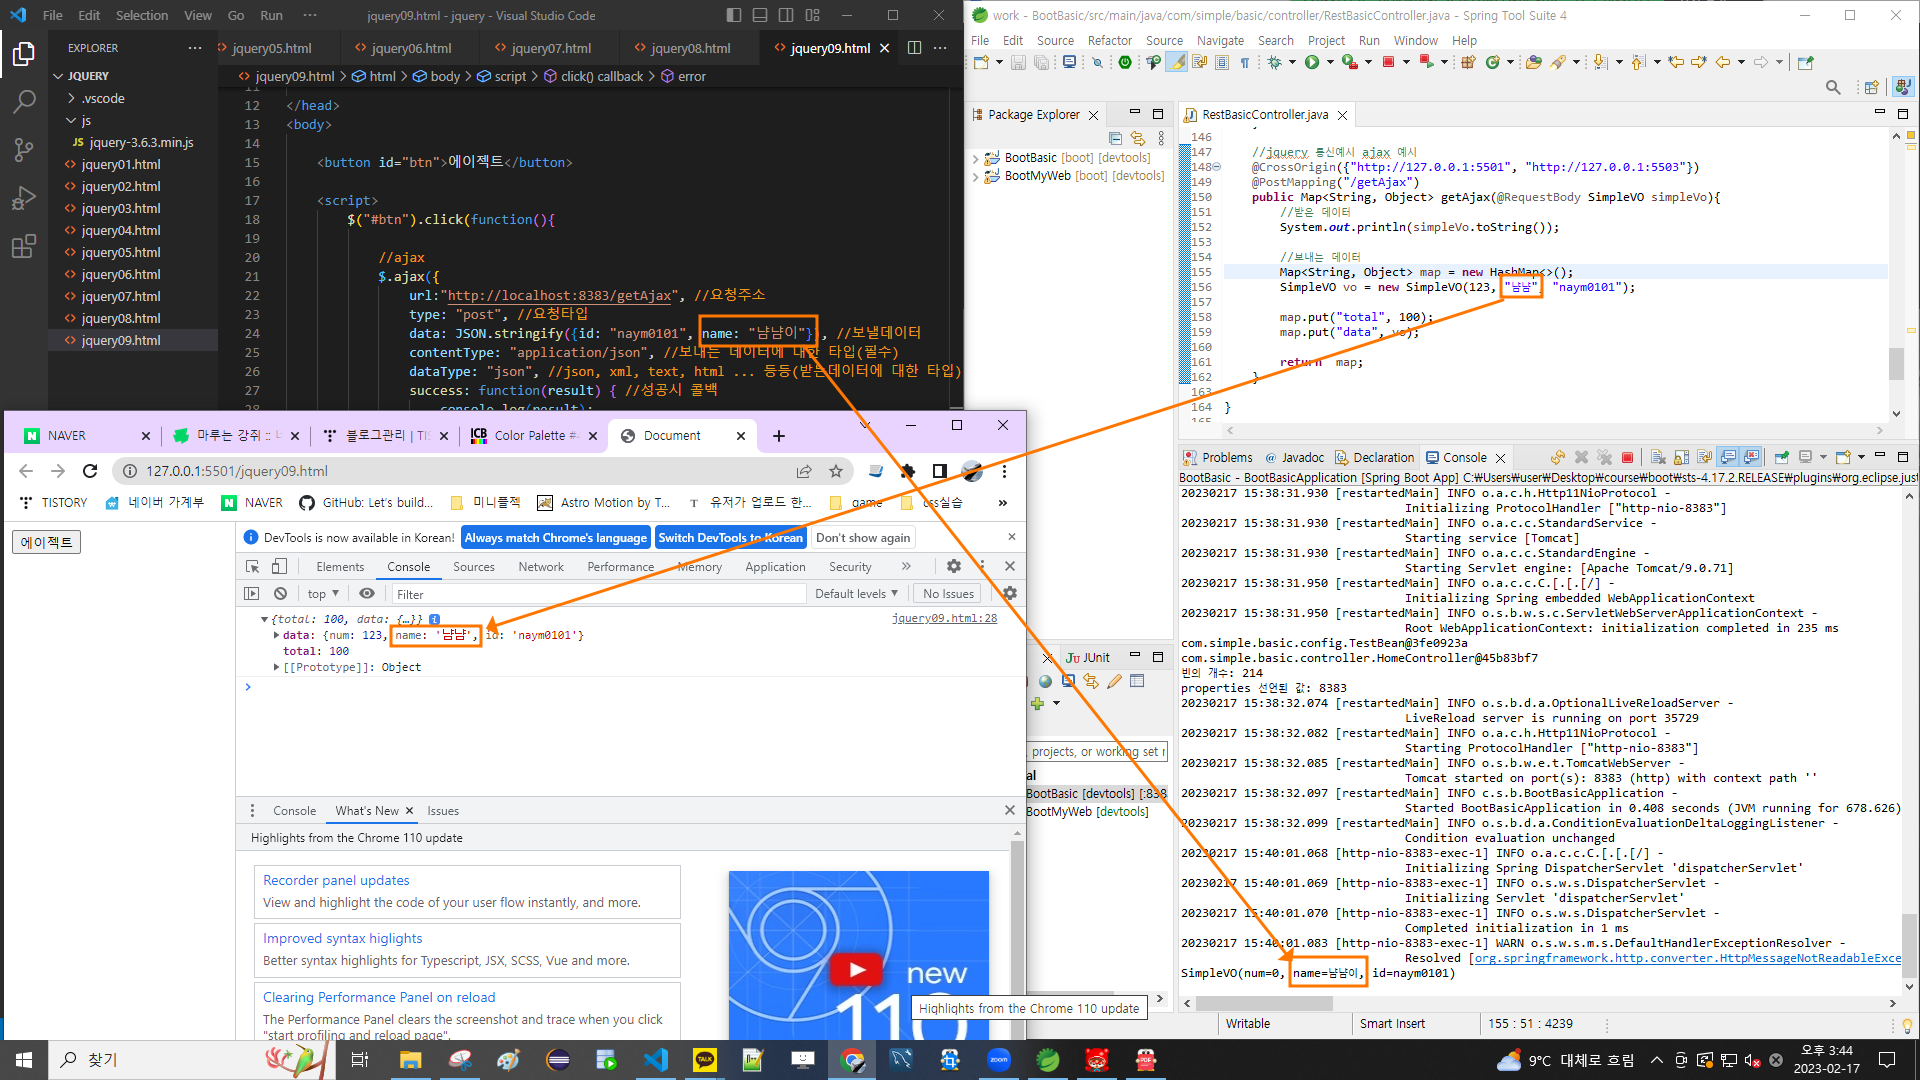
<button id="btn">에이젝트</button>
<script>
$("#btn").click(function () {
//ajax
$.ajax({
url: "http://localhost:8383/postAjax", //요청 주소
type: "post", //요청 타입
data: JSON.stringify({ id: "aaa123", name: "홍길동" }), //보낼 데이터
contentType: "application/json", //보내는 데이터에 대한 타입(post에서는 필수)
dataType: "json", //json, xml, text, html ... 등 (받는 데이터에 대한 타입)(옵션)
success: function (result) {
//성공시 콜백
console.log(result);
},
error: function (err) {
//실패시 콜백
console.log(err);
},
});
});
</script>
      <html />


         //jquery - ajax 예시
   @CrossOrigin({"http://127.0.0.1:5502",
		   		 "http://localhost:5502"}) //중괄호 문법 가능
   @PostMapping("/postAjax")
   public Map<String, Object> postAjax(@RequestBody SimpleVO simpleVo) {

	   //받은 데이터
	   System.out.println(simpleVo.toString());

	   //보내는 데이터
	   Map<String, Object> map = new HashMap<>();

	   SimpleVO vo = new SimpleVO("1", "홍길동", "aaa123");
	   map.put("total", 100);
	   map.put("data", vo);

	   return map;
   }
5.2. get
      <html />


      <input type="text" name="topic" id="topic" />
    <button id="btn2">get방식</button>

    <script>
      //버튼을 클릭하면 get방식으로 ajax 처리를 합니다.
      //getAjax/토픽값 요청 처리합니다.
      //get 방식은 주소에 입력값을 실어서 보내줌

      $("#btn2").click(function () {
        $.ajax({
          url: "http://localhost:8383/getAjax/" + $("#topic").val(), //요청 주소
          type: "get", //요청 타입
          contentType: "application/json", //보내는 데이터에 대한 타입(필수지만 주소에 보내니까 안적어도 됨)
          success: function (result) {
            //성공시 콜백
            console.log(result);
          },
          error: function (err) {
            //실패시 콜백
            console.log(err);
          },
        });
      });

      //강사님 답안
      $("#btn2").click(function () {
        var data = $("input[name='topic']").val();
        $.ajax({
          url: "http://localhost:8383/getAjax/" + data, //요청 주소
          type: "get", //요청 타입
          success: function (result) {
            //성공시 콜백
            console.log(result);
          },
          error: function (err) {
            //실패시 콜백
            console.log(err);
          },
        });
      });
    </script>
      <java />


         @CrossOrigin("*") //전부 허용
//   @CrossOrigin("http://127.0.0.1:5502")
   @GetMapping("/getAjax/{input}")
   public String getAjax(@PathVariable("input") String input) { //주소에 실어서 넘어가니까 @requestBody(본문에 실을 때) 필요없음

	   System.out.println(input);

	   return "success";
   }
5.3. 플러그인 - datepicker
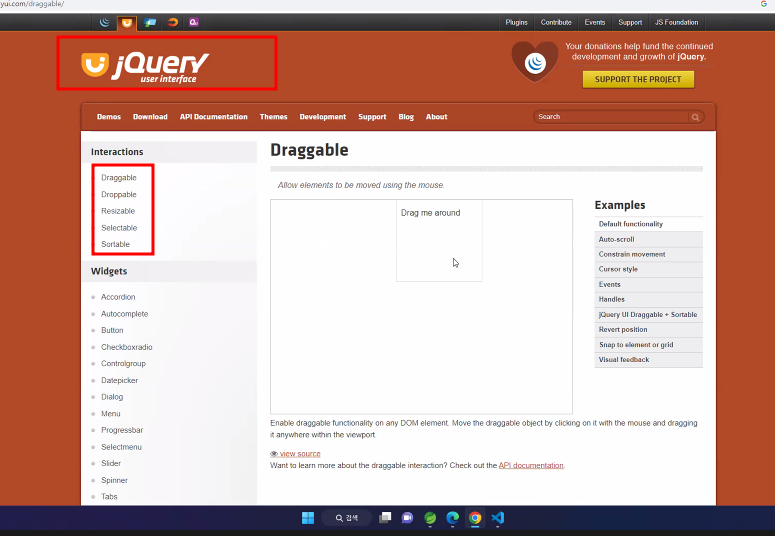
https://jqueryui.com/datepicker/
Datepicker | jQuery UI
Datepicker Select a date from a popup or inline calendar The datepicker is tied to a standard form input field. Focus on the input (click, or use the tab key) to open an interactive calendar in a small overlay. Choose a date, click elsewhere on the page (b
jqueryui.com
      <html />


      <!DOCTYPE html>
<html lang="en">
<head>
    <meta charset="UTF-8">
    <meta http-equiv="X-UA-Compatible" content="IE=edge">
    <meta name="viewport" content="width=device-width, initial-scale=1.0">
    <title>Document</title>

    <!-- jquery-ui css -->
    <link rel="stylesheet" href="//code.jquery.com/ui/1.13.2/themes/base/jquery-ui.css">
    <!-- jquery -->
    <script src="https://code.jquery.com/jquery-3.6.0.js"></script>
    <!-- jquery-ui -->
    <script src="https://code.jquery.com/ui/1.13.2/jquery-ui.js"></script>
</head>

<body>
    <script>
    //옵션들은 가져가다 쓰면 됨
    //https://jqueryui.com/datepicker/

        $(function() {
            $("#datepicker").datepicker({
                showButtonPanel: true //옵션
            });
            $( "#datepicker" ).datepicker( "option", "dateFormat", "yy-mm-dd" ); //날짜 서식 옵션
        })
    </script>

    <h3>제이쿼리 플러그인 (데이트피커)</h3>

    <input type="text" id="datepicker"></p>
</body>
</html>
- jquery-ui, jquery-ui css 가져와서 플러그인 사용
오늘 하루
기억에 남는 부분
-
-
어려운 부분
-
-
문제 해결 부분
-
-
'클라이언트 > jQuery' 카테고리의 다른 글
| [Jquery] BootMyweb (2) - 카테고리 처리, sql join (0) | 2023.02.20 |
|---|